Wednesday, April 30, 2008

Something Old and Something New

Most crazy quilters love old linens, hankies, tatting, embroidery and such. I have a great friend who is fortunate enough to have some treasures her grandmother made. One was especially beautiful and I want to share a photo with you. Debi says it's somewhere around 70 years old.


Although she has never done any crazy quilting I think I've convinced her that she needs to piece a block and see if she likes it. With all these wonderful heirlooms she has a head start on collecting stash.
A solid base of triple crochets forms the skirt. The ruffles are made individually and attached to the skirt. Her grandmother has used a really fine thread. It's a beautiful piece of heirloom crochet.


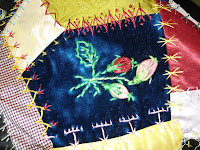
Now for the new......the ladies in Tomball had made a wonderful pincushion with old CDs. They kindly shared how they did it and I pieced one at the retreat. I put it together last week and I'm really pleased with how it turned out.


Although beautiful, pink is not a color I would normally use to piece a block. Pat and Diana had brought some samples to share with the group and I picked out these fabrics to use. I'm really glad I did!

Jan shared some hand-dyed silk and the pattern for the grape leaf pictured on the left.


We all signed our names on a muslin heart at the retreat. I've put that heart on the bottom of my pincushion sandwiched between wool and a piece of tulle. I lightly burned the edges of the muslin to prevent fraying and it also gives it an aged appearance.
It's a fun and easy project and will be a wonderful keepsake from the Quilter's Cabin Retreat. I learned so many great things from this talented group of ladies and will share more in later posts.


Friday, April 25, 2008

Connie's Silk Screen Fabric Art


I am still excited with all I learned at our Quilter's Cabin Retreat last week. Today I want to share some photos of Connie's seascape wall hanging. It is definitely a work of art and I know you will enjoy seeing the photos I took. Thanks to Connie and Deborah for allowing me to post photos and tell you about this wonderful project. I zoomed in too close and didn't get the border...it's a navy fabric and a perfect color choice.


This beautiful work was created by Connie and presented to Deborah for a birthday gift. I tried to change my name to Deborah but it didn't work...they wouldn't let me bring this fabulous wall hanging home with me.

Connie says the sea dragon was created by using four silk screens: one for the leafy parts, the second for the branches, the third for the body and the fourth for the body parts; eyes, ears, horns, and spikes.

Connie took classes from Ginny Eckley, a well known artist from Kingwood, Texas. You will want to go online and check out her website. She offers workshops along with all the supplies you will need to do this beautiful art form.


The jelly fish (photo of left) was created by painting in colors and then hand quilting the shape. Isn't it unique?


Although Ginny has a large assortment of ready to use silk screens on her website, she also teaches how to create your own stencils from any of your own designs. This is what Connie did with her sea dragons and underwater seascape.


I am amazed at Connie's talent and this beautiful wall hanging she has created. I've added this to my list of things I must do!


Not only is Connie a wonderful fabric artist but also a great cook! Connie (in the red blouse) is standing beside Susie who dearly loved those homemade waffles. They were delicious!

Wednesday, April 23, 2008

More Retreat Photos


I want to share some additional photos taken at our recent retreat. I would like to thank all these talented ladies for giving me permission to post pictures of their beautiful work.


Everyone had such a great time and we are planning another retreat in September.

Pictured above (left) is Pat and Diana busy working on their projects.

On the right is a small wall hanging done by Karen. There are 20 blocks, each measuring about 2 1/2" and embellished with delicate lace and beautiful seam treatments.


Karen has also done this fish wall hanging pictured on the right. The body of the fish is crazy quilted in small blocks and cut to shape. Each tail in pieced in a fan shape.


The photo on the left is Karen busy at work in the kitchen. We all helped with cooking and the clean up afterward. Thank goodness for dishwashers!


Pictured below is Janet, Susie and Deborah. We had a mini dyeing lesson on the front porch. I was sharing the technique my dear friend Lynnis uses in edge dyeing her silk ribbons. The current issue of CQMagOnline went live today. I've written an article featuring Lynnis which includes step by step instructions on this dyeing process.


In another post I will share some photos of Connie's beautiful work. She is in the photo on the right surrounded by all those beautiful crazy quilts.


I also want to share some additional photos of the Quilter's Cabin Retreat in Tomball. It is such a beautiful setting and equipped to handle all our needs.
Pictured on the left is the bedroom Julie, Jan and I shared. Home away from home....and so comfortable!


Sunday, April 20, 2008

Been Stitching.....


My apologies for being so tardy with my blogging. On Thursday, the 17th. Jan, Jules and I left for a four day retreat in Tomball, TX. Quilter's Cabin is a wonderful setting for getting away from the mundane daily chores and relaxing among friends who have the same love of crazy quilting as I do.

There were twelve attending the retreat and the four days and three nights were packed with fun. Deborah did a fabulous job of organizing, stocking food, and planning all the fun events and shopping experiences. It was difficult to pack up and leave. Everyone had such a great time and we plan to continue these retreats.

I've been given permission to share some of the fabulous work done by the ladies attending the retreat and will be blogging about it in the weeks to come. The picture on the left show Jules busy at work.


Before telling you more about the retreat I need to share several pictures of how I made my yoyo roses. I promised Judith I would do this and I am certainly behind on that promise.

I use the small Clover yoyo maker and Hanah silk to make each circle. In the pictures below Jan has hand-dyed a silk satin . With the yoyo maker you will form six loosely gathered petals. This photo show how loose you should leave the yoyo. You will need to make six of these.

I make a small box pleat on one side of each petal and stitch it to the fabric. This will be the inner part of the flower.

The outside gathered area of each petal will be tucked under slightly and stitched in several places. I forgot to take a picture of the box pleat will be glad to do that and add it to this article if anyone would like that photo.

Leave a small circle in the middle of the petals to add French knots and some matching beads for sparkle. Here is a picture of the ones I made.
The previous article on my blog was the inspiration for these yoyo flowers. The vintage quilt owned by my friend Chris had these flowers in the center. I was determined to make something similar. Judith told me they might be made from the yoyo. With that in mind I started experimenting and came up with these flowers.
If you like the flowers and have problems please email me with any questions and I'll try to help.


Wednesday, April 9, 2008

A Glimpse of the Old


I've mentioned my local CQ Bee and the wonderful ladies who make up this group. They are all so talented and just to attend the meetings each week is an inspiration. Yesterday Chris brought two crazy quilts that she had recently purchased. I took a number of pictures and she graciously agreed for me to share the photos on my blog.

This first one is more of a wall hanging size. The blocks are small and the stitches are simple as most of the old ones are. The fabrics are beautiful and it's in great shape.

The second one is absolutely beautiful. The stitching is still simple but the talented artist had mastered the long and short stitch and fabric painting.

The following four photos show some of the long and short stitch motif.


In the center of the block is a gorgeous motif of handmade roses. I have absolutely no knowledge when it comes to dating a quilt but it would be interesting to know. The leaves in this motif are made with a really fine chenille thread.

Of course, I loves roses so I took quite a few photos. The following are close-ups of the same motif.

In this one you can see the fine chenille thread that has been used.


Aren't these flowers simply beautiful! I would love to be able to reproduce them.


Both quilts are definitely treasures. I just can't imagine anyone selling these family heirlooms but it's wonderful for them to find a great home where someone appreciates and loves the work.


Tuesday, April 1, 2008

Stash Building...


Today was my CQ Bee meeting and I was able to accomplish several things I've been wanting to do. I finished a needle case I've been working on for several weeks. In an earlier post I listed a few steps in making this cabbage rose.

Silk Ribbon Heirlooms, a yahoo group hosted by Willa Fuller and Victoria Adams Brown, is having an exchange. Jan, a dear friend and fellow CQer, made a similar one for the exchange and I just had to have one for myself. Isn't is horrible when you want everything you see? Definitely one of my shortcomings!

I need to buy a pair of the stork scissors for the beaded scissor fob and it will be ready to use. I probably have a needle case for every day of the week but they are so much fun to make.

Linda, Lynnis and I went to Fredericksburg, TX for the long weekend and had a fabulous time shopping. It's a little German town located about 300 miles to the west and a popular tourist attraction known for their antiques and gift shops.

They have several really nice bead shops and I found some beads for my cabochon Vic made. When the shops closed for the day we went back to our motel and stitched until bedtime. I've taken a picture of the progress so far. I want to add some fringe at the bottom of the cab.

I wish my camera would capture the beauty and sparkle of this cab. Vic did a wonderful job molding this and painting it. The beads are a great match and I plan to wear it as a pin for now. I think it would be a beautiful addition to a purse so that's another project for later.

I carried my needlepoint bag this weekend and received many compliments in Fredericksburg. It's huge but wonderful for shopping and carrying everything I need. I've included four pockets on the inside so I can keep up with those things I need to get to......like credit cards, checkbook, etc.

I made my purse several years ago and have really enjoyed it. I had the piece of needlepoint and made up the pattern as I went to accommodate the size of the canvas.

I want to make another smaller one when I find that "just perfect" needlepoint canvas. The back of the purse is a gold velvet and it's lined with an ecru moire with velvet-edged pockets.